Wireguard EP.1 - iptables for sharing LAN game server on the internet
The problem#
Recently I wanted to host a Project Zomboid server on my laptop. I haven’t yet found a multiplayer server that has the perfect combination of mods and mechanics that fits the vibe I’m looking for. Furthermore I don’t play much, so everything I would do on a multiplayer server would be wiped after a few weeks.
So I decided to host a custom server on my laptop and start it when I want to play with friends.
The problem is that I don’t have frien… *cough*… The problem is that I don’t have a static IP address at home.
I face this problem whenever I need to publicly share a resource intensive application. Renting a powerful server is out of question. I have no money for that. I already have the required hardware, I just need my computers to be reachable from the internet on specific ports.
It would be nice sharing services running locally to my friends and colleagues when I need it.
Since the server hosting this site has a public IP address, I decided to use it as a gateway to my local PC using the Wireguard VPN.
Why not configure port forwarding?#
I can’t seem to make port forwarding work on the shitty management interface of my ISP’s router. Since I’m already fed up of dealing with it I decided to use another method.
Moreover, setting port forwarding on my home router would solve my problem only if I was connecting from my home. I need a system that allows me to share services regardless from where I’m connecting.
Why not use SSH tunneling?#
SSH is based on TCP and I don’t want to encapsulate UDP packets in TCP. That would cause retransmission of packets that would slow the UDP flow. I would prefer to encapsulate TCP in the UDP packets of a VPN.
Using a VPN seems the best choice and with a few iptables commands I can upgrade my public server to a router for the machines in my VPN.
Wireguard VPN#
Today was the first time I set up a Wireguard VPN and it seems very easy to setup. Last time I set up a VPN for myself, I used OpenVPN and had to create my own certificate authority to sign certificates and stuff.
With Wireguard it was a matter of a couple of commands and some copy-pasting of the keys.
Generate Keys#
After installing Wireguard, you need few commands to generate the required keys as detailed in the Wireguard Quickstart guide:
$ umask 077
$ wg genkey > privatekey
$ wg pubkey < privatekey > publickey
That’s it, you have a keypair. Generate one for the client and one for the server.
You can place these files where you want, I placed them in /etc/wireguard/, the same folder where I’ll save the configuration file for the VPN.
Setting up the server#
I created the file /etc/wireguard/wg0.conf for configuring the VPN interface wg0 on the server:
[Interface]
PrivateKey = <SERVER PRIVATE KEY>
Address = 10.0.0.1/24
ListenPort = 51820
PostUp = iptables -A FORWARD -i wg0 -j ACCEPT; iptables -t nat -A POSTROUTING -o wg0 -j MASQUERADE; iptables -t nat -A POSTROUTING -o eth0 -j MASQUERADE
PostDown = iptables -D FORWARD -i wg0 -j ACCEPT; iptables -t nat -D POSTROUTING -o wg0 -j MASQUERADE; iptables -t nat -D POSTROUTING -o eth0 -j MASQUERADE

[Peer]
PublicKey = <CLIENT PUBLIC KEY>
AllowedIPs = 10.0.0.2/32
Don’t mind the PostUp and PostDown options, I’m going to explain them later.
- In the
Addressfield you should insert the desired VPN IP for the server. - In the
AllowedIPsfield of the Peer section you should add the VPN IP assigned to the client. - You can choose any port for the
ListenPortoption but I used the Wireguard default ones.
I can now start the VPN server:
# wg-quick up wg0
[#] ip link add wg0 type wireguard
[#] wg setconf wg0 /dev/fd/63
[#] ip -4 address add 10.0.0.1/24 dev wg0
[#] ip link set mtu 1420 up dev wg0
[#] iptables -A FORWARD -i wg0 -j ACCEPT; iptables -t nat -A POSTROUTING -o wg0 -j MASQUERADE; iptables -t nat -A POSTROUTING -o eth0 -j MASQUERAD
Setting up the client#
For the client I created also the file /etc/wireguard/wg0.conf:
[Interface]
PrivateKey = <CLIENT PRIVATE KEY>
Address = 10.0.0.2/32
PostUp = ping -c 1 10.0.0.1

[Peer]
PublicKey = <SERVER PUBLIC KEY>
Endpoint = deafgod.xyz:51820
AllowedIPs = 10.0.0.1/32
PersistentKeepalive = 20
The fields are pretty much self-explanatory, but there are two interesting ones:
PostUp: I ping the VPN server after enabling the interface to check the connectionPersistentKeepalive: Since my laptop is behind a NAT, the connection needs to be kept alive from the laptop side, so a ‘ping’ is sent every 20 seconds. This may go against the philosophy of Wireguard which tries to be as silent as possible, but I need it.
We can now enable the VPN interface on the laptop side:
# wg-quick up wg0
[#] ip link add wg0 type wireguard
[#] wg setconf wg0 /dev/fd/63
[#] ip -4 address add 10.0.0.2/32 dev wg0
[#] ip link set mtu 1420 up dev wg0
[#] ip -4 route add 10.0.0.1/32 dev wg0
[#] ping -c 1 10.0.0.1
PING 10.0.0.1 (10.0.0.1) 56(84) bytes of data.
64 bytes from 10.0.0.1: icmp_seq=1 ttl=64 time=105 ms

--- 10.0.0.1 ping statistics ---
1 packets transmitted, 1 received, 0% packet loss, time 0ms
rtt min/avg/max/mdev = 104.572/104.572/104.572/0.000 ms
Now the laptop and the server can talk to each other through the VPN interfaces 😁
Setting up iptables rules#
Now that my machines are both in the VPN, we need to setup iptables rules to route traffic from Internet to the laptop and viceversa.
Right now we have this situation:
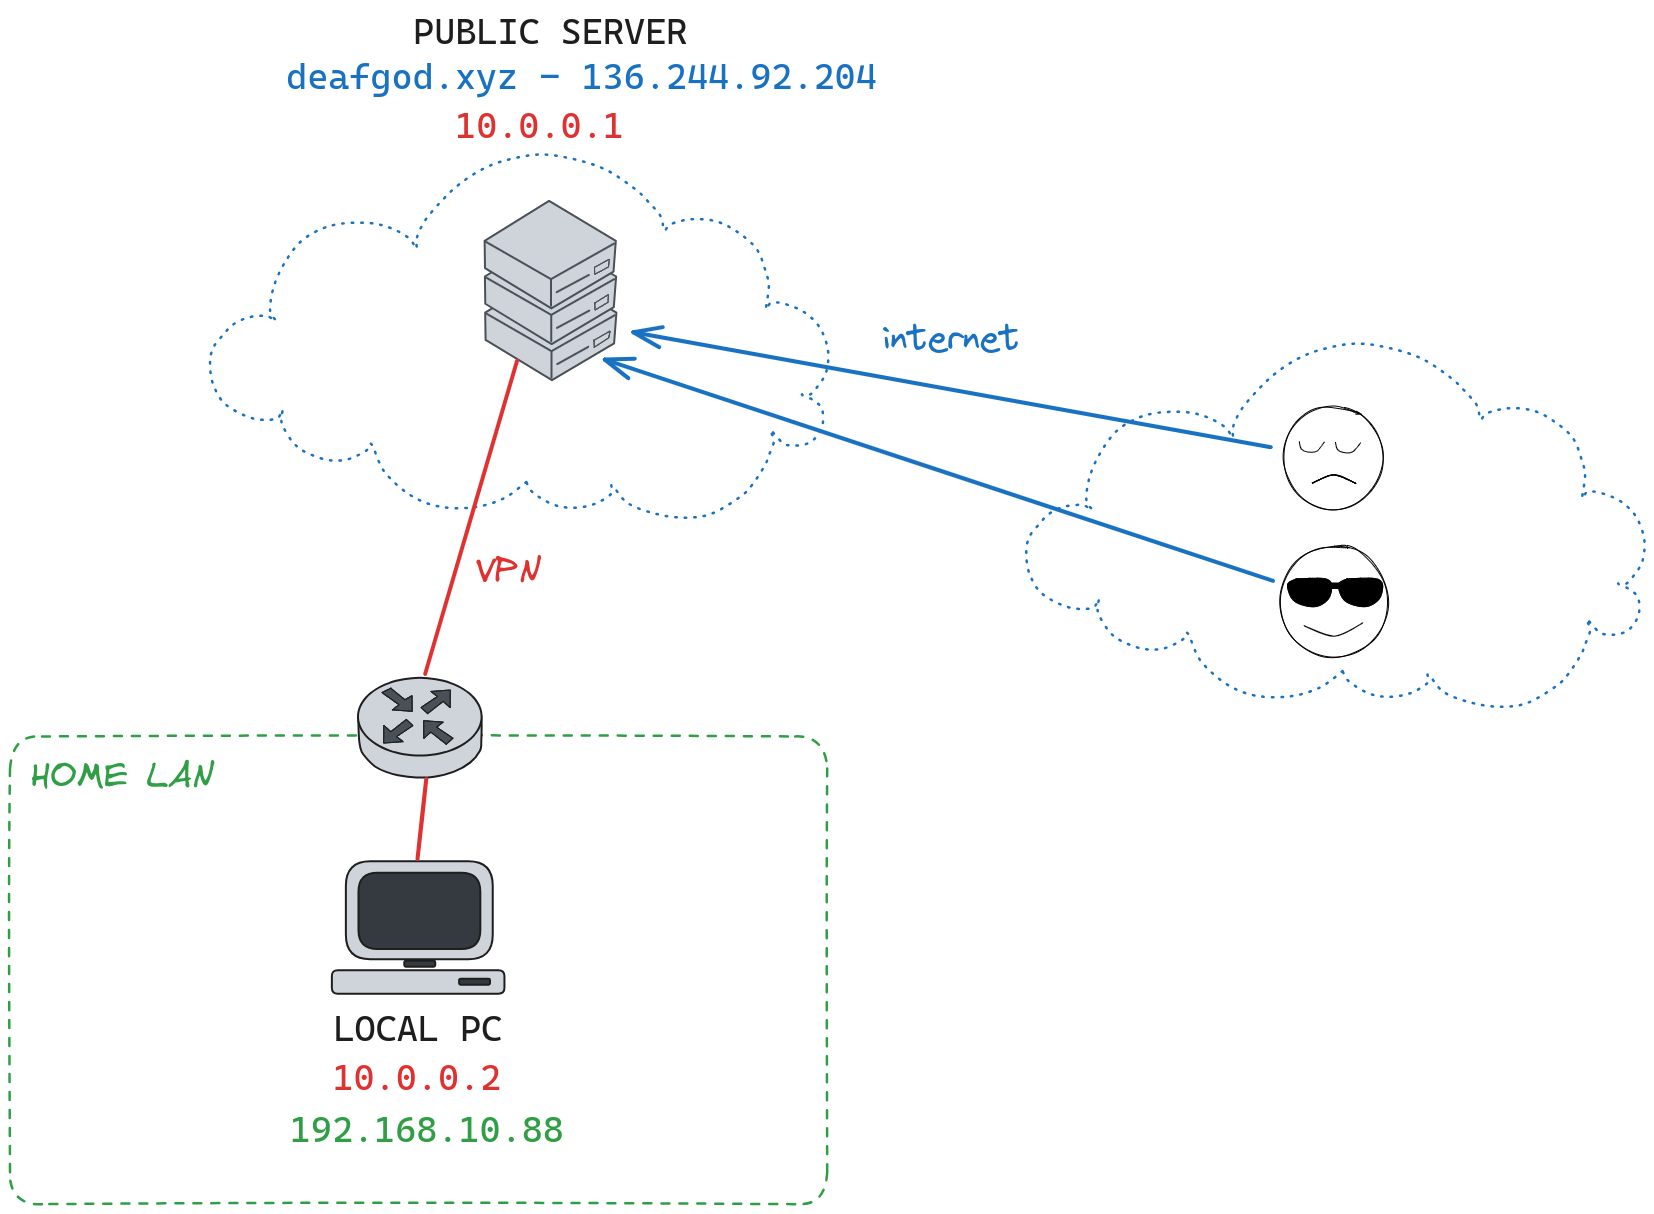
Before explaining with an example the rules I added, I need to explain how some iptables chains are used.
iptables chains of interest#
-
PREROUTING: This chain is processed before a packet is routed. The rules in this chain are applied before understanding where the packet needs to be routed to and we need it for NAT and changing a packet’s destination address.
-
FORWARD: The FORWARD chain is processed for packets that are being routed through the system to another network interface. We need rules in this chain to make our server act as router between our laptop and the internet.
-
POSTROUTING: This chain is processed after a packet has been routed. We need this chain to change a packet source address.
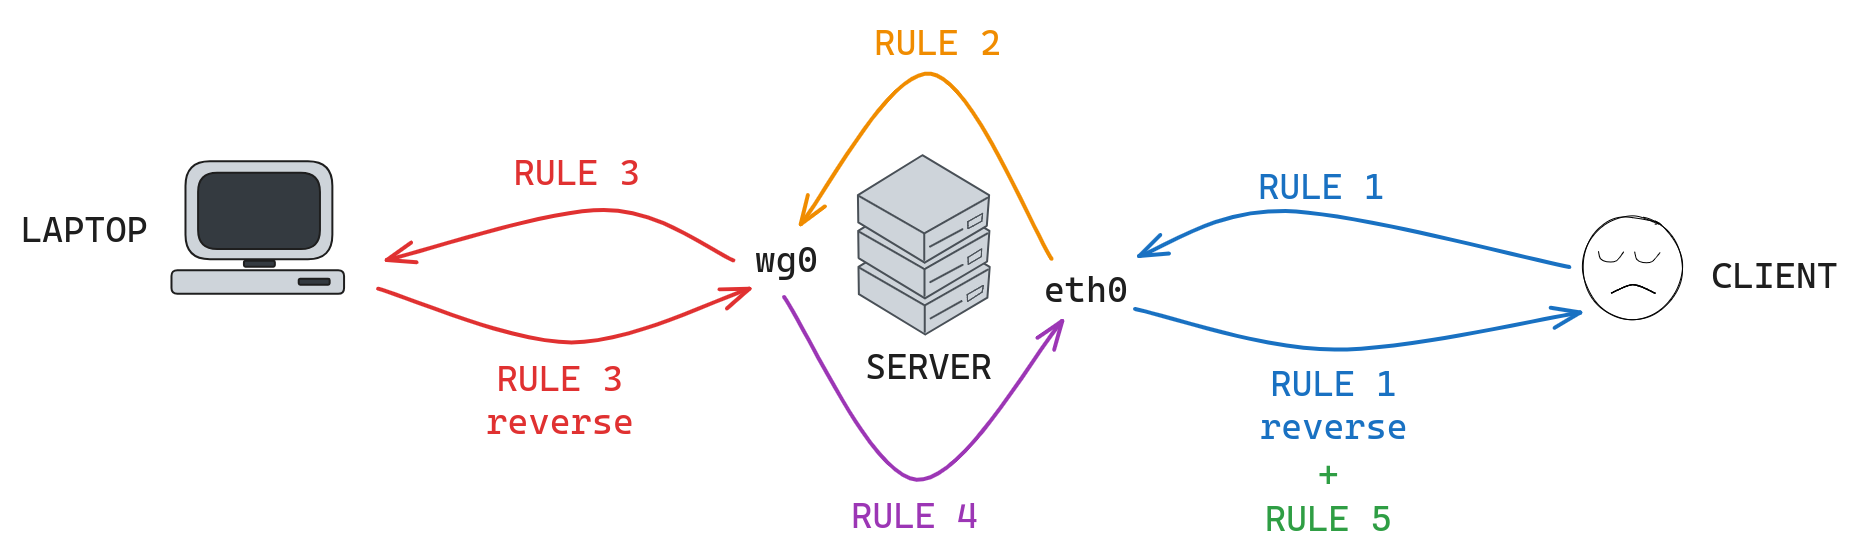
Rules explained#
Now to the example!
Suppose I have 3 machines:
- Server: 136.244.92.204 (Public) - 10.0.0.1 (VPN)
- Laptop: 10.0.0.2 (VPN)
- Random Client on the Internet: 22.33.44.55 (Hypotetical IP)
There is a service listening on port 9999 of the LAN laptop.
We want the client to send requests to this service through port 9999 of the server.
Request
When the packet is sent from the Client and received from the Server it has this structure:
| SrcIP | SrcPort | DstIp | DstPort | Proto |
|---|---|---|---|---|
| 22.33.44.55 | 9999 | 136.244.92.204 | 9999 | udp |
RULE 1
First of all we need to change the destination address so that it can be routed to the laptop.
iptables -t nat -A PREROUTING -p udp --dport 9999 -j DNAT --to-destination 10.0.0.2:9999
The packet has now this structure:
| SrcIP | SrcPort | DstIp | DstPort | Proto |
|---|---|---|---|---|
| 22.33.44.55 | 9999 | 10.0.0.2 | 9999 | udp |
The DNAT action takes care of re-translating the destination address back to the original one when a response is received.
Enable IPv4 Forwarding
Before proceeding, we need to enable IPv4 forwarding on our server so it can act as a router.
On Debian, edit the following line in /etc/sysctl.conf:
net.ipv4.ip_forward=1
Then reboot or execute:
# sysctl -p
RULE 2
The packet can now be forwarded to the VPN interface wg0.
The following rule allows the UDP packets destined to 10.0.0.2:9999 to be forwarded to a different interface:
iptables -A FORWARD -p udp --dport 9999 -d 10.0.0.2 -j ACCEPT
The structure of the packet hasn’t changed in this step.
RULE 3
iptables -t nat -A POSTROUTING -o wg0 -j MASQUERADE
The previous rule changes the source address of all the packets routed to wg0 to appear as coming from the server:
The packet now appears like this:
| SrcIP | SrcPort | DstIp | DstPort | Proto |
|---|---|---|---|---|
| 10.0.0.1 | 9999 | 10.0.0.2 | 9999 | udp |
The MASQUERADE action remembers the original address and re-translates it back when it receives the response.
I could make this rule more specific, but since I have only my laptop on the VPN, it is good enough for now.
Response
Now the laptop has received a request and can compute a response.
The response sent by the laptop has this structure:
| SrcIP | SrcPort | DstIp | DstPort | Proto |
|---|---|---|---|---|
| 10.0.0.2 | 9999 | 10.0.0.1 | 9999 | udp |
The destination address of this packet gets modified by reversing the MASQUERADE action of RULE 3 as soon as it is received from the server:
| SrcIP | SrcPort | DstIp | DstPort | Proto |
|---|---|---|---|---|
| 10.0.0.2 | 9999 | 22.33.44.55 | 9999 | udp |
RULE 4
The packet can now be routed to the eth0 interface in order to get sent back to the client.
We have to enable the forwarding of packets coming from the wg0 interface to other interfaces.
iptables -A FORWARD -i wg0 -j ACCEPT
After being routed to the eth0 interface, the packet’s source address gets modified by reversing the DNAT action of RULE 1:
| SrcIP | SrcPort | DstIp | DstPort | Proto |
|---|---|---|---|---|
| 136.244.92.204 | 9999 | 22.33.44.55 | 9999 | udp |
The client receives now the response without noticing that it came from a ‘device behind NAT’.
RULE 5
Although not stricly necessary, I added another rule that modifies the source address of all packets routed to the eth0 interface to appear as coming form the server.
iptables -t nat -A POSTROUTING -o eth0 -j MASQUERADE
A quick recap
| Rule | Code |
|---|---|
| 1 | iptables -t nat -A PREROUTING -p udp --dport 9999 -j DNAT --to-destination 10.0.0.2:9999 |
| 2 | iptables -A FORWARD -p udp --dport 9999 -d 10.0.0.2 -j ACCEPT |
| 3 | iptables -t nat -A POSTROUTING -o wg0 -j MASQUERADE |
| 4 | iptables -A FORWARD -i wg0 -j ACCEPT |
| 5 | iptables -t nat -A POSTROUTING -o eth0 -j MASQUERADE |
PostUp Explained#
We can now see that the value of the PostUp field of the server confuration file are rules 3,4, and 5. Since those rules are general, I add them in the moment of the interface startup.
Rules 1 and 2 depends on the port number and protocol we want forward so I made two dirty scripts to add/remove them quickly:
# add_iptable_rules.sh udp 5555
# rm_iptable_rules.sh udp 5555
Here the add_iptable_rules.sh code:
#!/bin/bash

if [ "$#" -ne 2 ]; then
  echo "Usage: $0 <protocol> <port>"
  exit 1
fi

protocol="$1"
port="$2"
destination_ip="10.0.0.2"

iptables -t nat -A PREROUTING -p "$protocol" --dport "$port" -j DNAT --to-destination "$destination_ip":"$port"
iptables -A FORWARD -p "$protocol" -d "$destination_ip" --dport "$port" -j ACCEPT

echo "Iptables rules added successfully for $protocol on port $port."
rm_iptables_rules.sh has the same code, but removes the rules instead of adding them.
Video Demo#
Here’s a video demo of the game server hosted locally with a client that connect to it through Internet. (The first login didn’t work because I forgot the password of the test character).
Conclusions#
Everything seems to work!
I could refine some rules or setup the systemd service, but it is good for now.
I’ll do some wireshark and tcpdump tests in the future to check in more detail how the packets are routed and exchanged, but I played with it enough.
If I’ll ever find friends to play with, I’ll let you know how the server runs 😉